Amazon’s managed Kubernetes service, EKS, recently went GA. Here are a few things I learnt spinning up an EKS cluster for the first time, and running the kube-bench tests on it.
Creating an EKS cluster
Navigating to the EKS service in AWS makes it look as though it’s going to be SUPER-simple to set up your Kubernetes cluster. How easy would it be if all you had to do was specify the cluster name?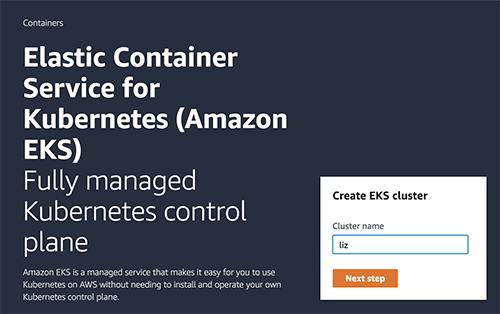
It would be fantastic if that were all you had to do, but there are going to be a few more steps, and I found myself navigating through a couple of issues, so hopefully this write-up of my experiences will help someone else.
Rather than just hitting “Next step” on that tempting looking EKS dialog, I’d recommend you to take a quick look through this post, and then work through the AWS Getting Started guide.Are you the right kind of user?
TL:DR; don’t use the AWS console to create an EKS cluster if you’re signed in through a federated login
Our AWS account was recently set up with federated logins via our Google accounts. For this kind of account, there doesn’t seem to be an easy way to get AWS access keys and secrets for use with the AWS CLI. (There might be a hard way, but I didn’t try this out.)
My federated login does let me create users, so I figured I could create a new IAM User for this experiment, grab the keys and add them as a new profile in my AWS config. Once you have created your EKS cluster there are instructions for setting up a kubeconfig that uses heptio-authenticator-aws so that kubectl can authenticate to the EKS cluster using your AWS credentials - in my case, the credentials for this new user I just created.
Now, I am not an expert in all things IAM, and some of the terminology arounds Users, Roles, Principals and so on does not come naturally to me. There are some helpful hints on the heptio-authenticator-aws GitHub Readme, which lead me to discover an additional step: I needed to add my new user into the Trust Relationships for the EKS Service Role (creating that service role is the first of the pre-requisites described on the EKS Getting Started guide).
The Trust Relationships for that Role now look like this, where my new user is called liz-eks:
| { "Version": "2012-10-17", "Statement": [ { "Effect": "Allow", "Principal": { "Service": "eks.amazonaws.com", "AWS": "arn:aws:iam::<account id>:user/liz-eks" }, |
This got me to the point where the authenticator could successfully get tokens, but I couldn’t get kubectl to use this to communicate with the Kubernetes API on the cluster. I’d see the error “You must be logged in to the server (the server has asked for the client to provide credentials)”.
There is an Important Note in Step 1 of the Getting Started guide for EKS that highlights that you shouldn’t create an EKS cluster when you’re signed in with root credentials. I suspect that root credential users and federated users are in the same boat here.
I destroyed the cluster I had set up via the console and created a new one via the CLI, using my AWS profile with access keys (and with the trust relationship I had previously created), and all was good.
Networking
TL:DR; specify all the subnets, both public and private, when creating the EKS cluster.
You need a VPC for EKS to operate in, so move away from that tempting EKS screen and go create yourself a VPC first.
You need a VPC with subnets in at least two availability zones - if you don’t, you’ll get this:
| An error occurred (InvalidParameterException) when calling the CreateCluster operation: Subnets specified must be in at least two different AZs |
The Getting Started guide uses a VPC template that only includes public subnets, but there is also a tutorial for creating a VPC with both public and private subnets in two availability zones.
Why would you want both public and private subnets? You get to choose the subnets (within your VPC) where your Kubernetes worker nodes will run, and it’s recommended that you run your Kubernetes worker nodes in a private subnet. This makes it harder for an attacker to reach them, so it’s a good security measure.
You will run load balancers for public-facing services on the public subnets to make them accessible to the wider world. These load balancers should get automatically created when you add Kubernetes services to the EKS cluster.
If you’re going to use both public and private subnets as recommended, be sure to specify all of them in the subnetIds parameter when you create your EKS cluster. I somehow got the idea that I would only specify the private ones (perhaps because I half-remembered creating Fargate tasks on private subnets), but that meant that EKS couldn’t locate a public subnet on which to create a Load Balancer when I wanted to expose a service. The error you see for this on kubectl describe svc <service name> gives the game away:
| Error creating load balancer (will retry): failed to ensure load balancer for service default/nginx: could not find any suitable subnets for creating the ELB |
So, when you create the EKS cluster, give it all the subnets on the VPC. At the point when you create the worker nodes, these just get the private subnets.
Running an application on EKS
TL:DR; getting a pod running, and exposing the service publicly through a load balancer is really easy!
I created my VPC, then my EKS cluster, and then added some worker nodes, all by following the Getting Started guide. At this point I decided to go off-piste and deploy an nginx server.
The pod definition simply runs an nginx container. The more interesting part is the service. I’m hoping for a public-facing Load Balancer that will forward traffic to a pod that’s running on a worker node on private subnets.
kind: Service metadata: name: nginx labels: app: nginx spec: ports: - port: 3000 targetPort: nginx-port selector: app: nginx type: LoadBalancer |
This quickly brings up a load balancer, whose DNS name will appear as the External IP address (but since it’s very long you’ll want to use kubectl get svc -o wide in order to see it).

For no good reason I have brought up my service before there are any corresponding pods which map its app=nginx selector, but this YAML will do it.
|
apiVersion: v1 |
Browsing to that load balancer IP address, port 3000 (as specified in the service definition) gives me the Nginx welcome page: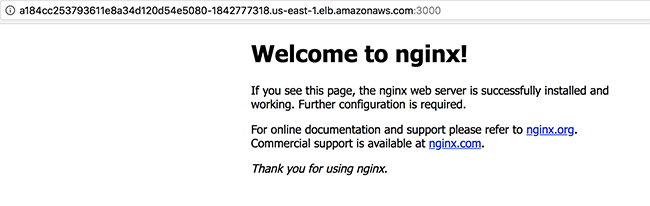
You can see the Load Balancer in the AWS console, but the “wiring up” of that load balancer doesn’t show up as Target Groups (in contrast to Fargate, where you can see the target groups that get created for services).
Running kube-bench
The kube-bench tool is an open-source implementation of the tests from the CIS Security Benchmark for Kubernetes. You can directly run this on the cluster with a kubectl command, as described in the project README.
Well, you can for the worker nodes, but not for the master. Here’s the command for running on the master:
| kubectl run --rm -i -t kube-bench-master --image=aquasec/ kube-bench:latest --restart=Never --overrides="{ \"apiVersion\": \"v1\", \"spec\": { \"hostPID\": true, \"nodeSelector\": { \"kubernetes.io/role\": \"master\" }, \"tolerations\": [ { \"key\": \"node-role.kubernetes.io/master\", \"operator\": \"Exists\", \"effect\": \"NoSchedule\" } ] } }" -- master --version 1.8 |
To run the master node tests, kube-bench needs to run on the master node. This command tries to ensure that it gets scheduled on a master by setting the nodeSelector to look for a node in the cluster with the role set to master. But in EKS we don’t have access to the master node; the pod simply never gets scheduled as the scheduler can’t find a node that matches that requirement.
How about the results for the worker nodes? There were a number of tests that failed, but in some cases there is a reasonable argument for why this is the case. For example, the CIS Benchmark recommends that the --allow-privileged is turned off on the API Server to prevent the user from running privileged containers. While this is a sensible security precaution for many (most?) deployments, perhaps if AWS turned this on there would be an outcry because EKS wouldn’t support privileged containers.
At the moment you specify an AMI (Amazon Machine Instance) for the worker nodes, and you don’t really have any choice in the matter. Perhaps AWS could offer an alternative AMI for a worker node configured to meet the CIS Benchmark recommendations?
Cleaning up
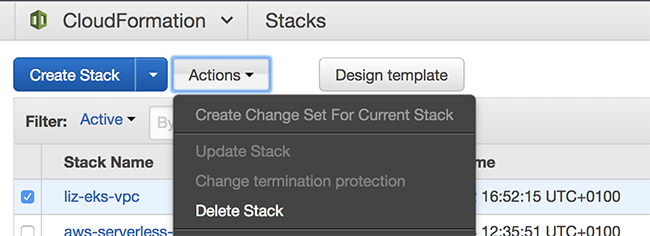
TL:DR; make life easier for yourself by deleting any public-facing Kubernetes services before deleting your CloudFormation stack for the VPC you createdWhen I was done with my cluster I wanted to remove all the resources I had created. Following the Getting Started guide had used two CloudFormation stacks - one for the VPC and one for the worker nodes. I deleted the EKS cluster, and used the CloudFormation Delete Stack option to remove the VPC and worker node resources.
Unfortunately this didn’t quite go as smoothly as I hoped. Making a Kubernetes service results in a Load Balancer being created, and if you use kubectl to delete the service, this will automatically delete the corresponding Load Balancer. However, it seems that the Load Balancer doesn’t automatically get destroyed if you just go ahead and delete the cluster without deleting the Kubernetes services when you delete the cluster.
The Load Balancer creates dependencies on your VPC and some of its resources, and these then can’t be cleaned up by the Delete Stack operation. If you find yourself in this position you simply have to find and delete the Load Balancers, and then try deleting the stack again.
Summary
Creating an EKS Cluster isn’t quite as simple as entering a name and pressing Go, but it’s relatively straightforward, and considerably easier than setting up the Kubernetes control plane yourself. AWS networking configuration can be complex, but by following the guides you can quickly get a config that helps you with high availability (by requiring you to operate in more than one availability zone) and security (if you follow the recommendation to run the worker nodes on a private subnet).This could be all the security you need for a basic deployment, but for enterprise-grade Kubernetes security, you can install Aqua’s Container Security Platform on EKS.