
In support of Amazon’s announcement this week at re:Invent surrounding the new AWS Container Marketplace, we’ve made the Aqua Container Security Platform available for on-demand consumption (pay as you go), via the newly minted AWS Container category in the Marketplace.
We have several new listings in the AWS Marketplace, but in this blog I’ll cover the two that secure workloads on Amazon ECS – namely the Aqua Container Security Platform for ECS (BYOL) and ECS (PAYG).
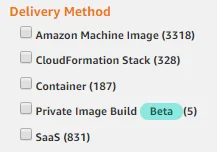
New: Containers on the AWS Marketplace
Until now, for an application to be available on the marketplace it had to be a VM (an Amazon Machine Image, or AMI). Even if your app was built in containers as Aqua is, you had to place it in an AMI.
Now, the AWS Marketplace sports a new delivery vehicle, containers!
So, how does this work?
AWS Marketplace registry (AWS MP ECR for short) resolves this issue with a user subscription and an authorization to the MP ECR that is similar to subscribing to an AMI. Docker pulls are authorized by the assigned Container instance IAM role – usually named ecsInstanceRole, if you followed this article when prepping to create ECS clusters. The ECS hosts themselves are then authorized to pull the subscribed containers from AWS MP ECR. Cool!
But isn’t deploying security tools within ECS hard? Not anymore!
Part of this ECS deployment has been a hard push on the part of Aqua’s cloud team to vastly improve the installation experience of our customers. As such, the Aqua CSP for ECS evolved into a single, simple to use Cloud Formation Template, hosted in the AWS Marketplace with RDS and HA options by default.
Aqua for Amazon ECS Offerings
Aqua has launched two offerings for ECS: a Pay as You Go (PAYG) offering and a Bring Your Own License (BYOL) offering.
PAYG is intended for customers whose budgets are OPEX-based, or who perhaps have “cloud bursting” needs within ECS. It’s also a great way to get started with container security if you’re making your first steps in container production workloads.
The BYOL offer is the traditional model, i.e.: You’ve already engaged with Aqua for a POC or you’ve procured a license via one of our channel partners.
The only difference between these offerings is the license – functionally they are identical. For this reason, I’m going to illustrate the PAYG process.
Note: It’s not technically possible to easily change a PAYG deployment to a BYOL or vice versa, as PAYG offers are billed via ECS task. You’ll need to terminate one and start the other.
Get Aqua for ECS on the AWS Marketplace
Search for ecs aqua
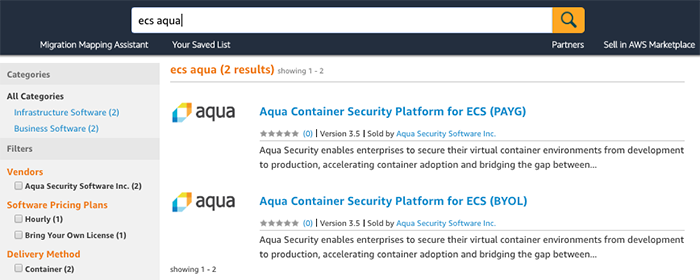
Selecting the PAYG shows the Aqua for ECS (PAYG) page that includes links to videos, deployment instructions, links to support, etc.
- Click Continue to Subscribe
- Read the terms and EULA, then click Continue to Configuration
- On the launch page, you’ll see the container group that is available. Select Continue to Launch.
This is where things get interesting: Deployment template, document and support links are all posted here. - Click Usage Instructions to create the Cloud Formation stack.
There are a lot of options here, allow me to describe them per option group.
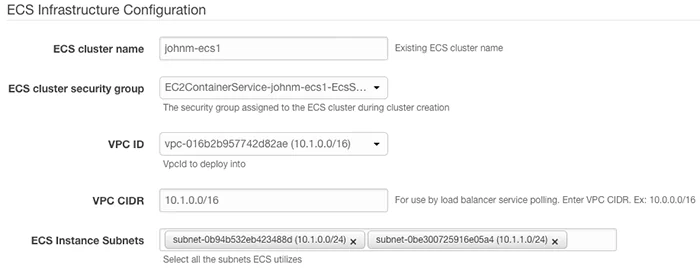
ECS Infrastructure Group
- Stack name
- ECS Cluster Name – This template is not creating a cluster. It references your existing ECS deployment.
- When deploying an ECS cluster, a default Security Group is created and assigned to the EC2 instances. Usually prefixed with “EC2ContainerService”. This information is necessary to set up the required Security Group rules.
- VPC CIDR. CloudFormation still has limits. Can’t add this to a dropdown list, yet. Please type it in.
- Subnets to be later used by the Aqua Console ALB and Aqua Gateway NLB. Didn’t I mention HA is implied in Aqua’s ECS deployment?
![]()
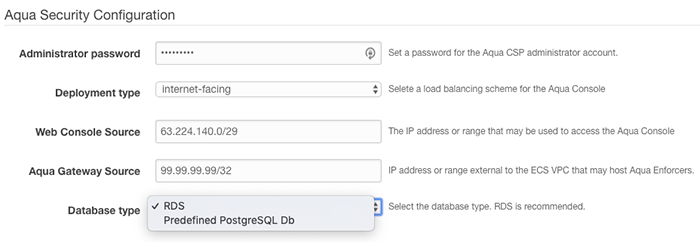
Aqua Security Configuration
- Administrator password
- Development Type allows non-internet connected customers to deploy and set the Aqua Console ALB properly for their scenario.
- Where will you be accessing the Aqua Console?
- By default the entire VPC can access the Aqua Gateway NLB; this option allows Aqua Enforcers in other VPCs or locations to be managed via the Aqua Console in this installation.
- Aqua recommends RDS when deploying the Aqua Console in ECS. This template creates an RDS instance for you. If you have another PostgreSQL instance you’d rather use, change this to Predefined PostgreSQL Db and fill out the optional section below.
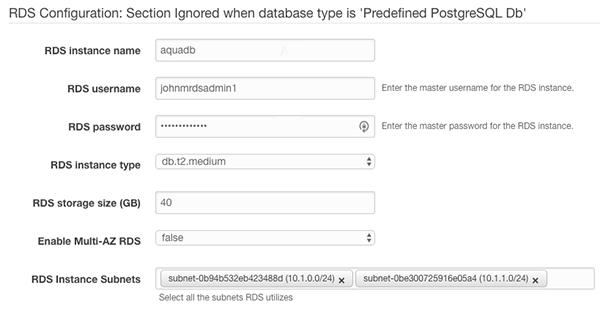
RDS Configuration
- RDS Instance name
- RDS admin username – cannot be “admin, awsadmin, etc”
- RDS admin password
- RDS instance type, the larger the type the faster the deployment of course!
- RDS Instance Subnets generally match the “ECS Instance Subnets”
IAM Role Assignment

Aqua ECS deployments that are deployed from the AWS Marketplace require two IAM policies. The first allows the container billing (for PAYG) or reporting (for BYOL) registration with the AWS Marketplace at startup. The second allows the Aqua Console to pull containers for scanning. Leaving this field blank allows Cloud Formation to create the necessary role.
The rest of the options are self-explanatory. Let’s click Create!
Switching to the CloudFormation console

You’ll see the AquaSecurityEcs primary template stack kickoff and a “nested” CF stack will also begin its run. This nested stack is your database options being processed. A RDS instance sized db.t2.medium will take approximately 9 minutes to deploy, so the overall CF template has a kill timer of fifteen minutes. The other Aqua components will start much faster, once the Db is available.
After the deployment completes, click on the Outputs column of your stack. There are three outputs, open the AquaConsole in your favorite browser.
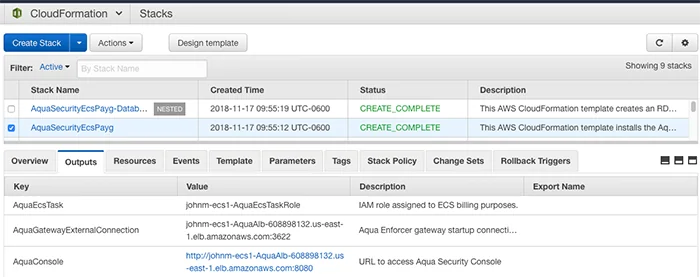
- AquaEcsTaskRole, the name of the role assigned to the ECS Task from.
- AquaGatewayExternalConnection, the DNS name to use if you want to connect Aqua Enforcers to this Aqua deployment that are in a different VPC or elsewhere.
- AquaConsole, the URL of your new console.
Login to the Aqua Console with administrator and the password you set during the wizard portion of the Cloud Formation stack.
You will now be presented with a request for an Aqua license. This is the only area where the BYOL and PAYG offers differ:
- A BYOL deployment may use a POC license or a paid license.
- A PAYG license is specific to ECS PAYG deployments and may be obtained via email automatically by clicking on the link in the portal and filling out the form.
Congratulations!
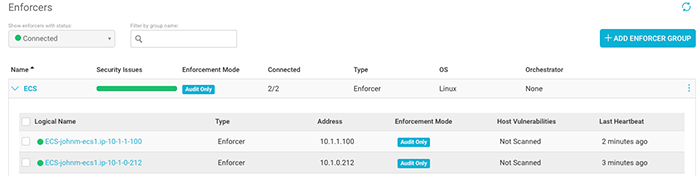
You’ve now successfully deployed the Aqua Console components and Aqua Enforcers on each ECS instance. The Enforcers in this configuration are set to audit mode by default, but the Cloud Formation template can easily be modified to include additional deployment variables.

Note that the Aqua Enforcers have been labeled with ECS – ECS Cluster Name for easy visual sorting in the console. Should the cluster experience a scaling event, the Enforcer daemonset will scale with it.
A note about Security Groups
Searching for “aquasecurity” in the EC2 console will reveal three new security groups. The first SG allows access to the ALB on port 8080 for WebUI access. Should you implement certificates on your ALB, of course you should change this to 443. The second SG is intended to enable easy deployments of Enforcers that are not installed in this VPC. The initial deployment does not rely on it. However, should one want to manage enforcers outside of this VPC, simply edit the dummy field “99.99.99.99/99” to include your source NAT IP or in the case of interconnected VPCs, the CIDR where those protected hosts live. The third SG will only exist when deploying RDS, as it allows inbound traffic to the RDS instance.

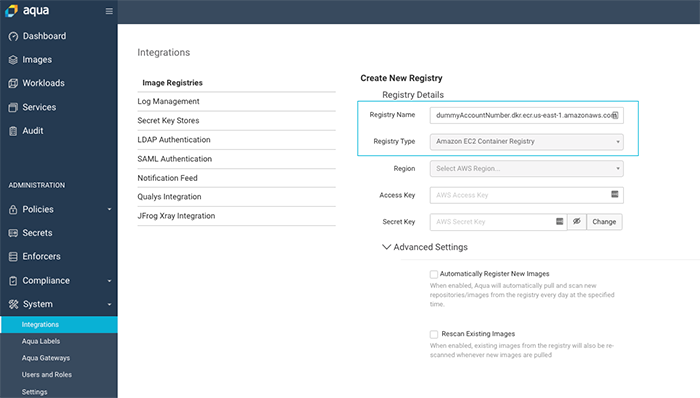
The next tasks will be setting up your ECR connection and creating some Image Assurance policies, but remember we created an IAM role, so it’s really just creating the pull patterns and schedule you decide on.
1 – Navigate to Settings > Integrations
2 – In the Image Registries area, select the Registry Type to be Amazon EC2 Container Registry
3 – Enter your Repository URI.
We can leave the Access Key and Secret Key fields blank.
Save changes and you’re ready to scan.
In Summary
The Aqua Container Security Platform for ECS is now available via AWS Marketplace for PAYG and BYOL consumers, and more importantly, it is easy to install!
If you have any questions, email the Aqua Cloud Team.